Some expenses are recurring, such as the invoice for the rent of a business premises.
The application allows you to mark such an expense as 'recurring', after which it will be automatically generated within your administration (for example) every month, without you having to worry about it.
See the following example:
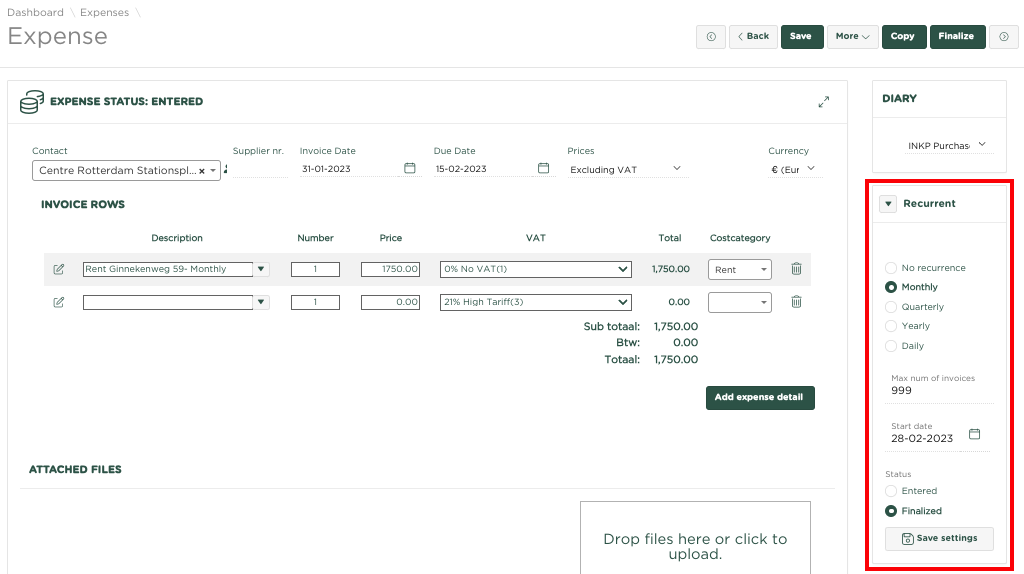
We enter the invoice for the rental of our business premises and indicate on the right side of the page, under Recurring, that this expense is Monthly Recurring and that the status of the generated invoice should be Final. We also need to enter a Start Date, from which date the next invoice must be generated.
The system periodically checks whether there are requests to generate a new edition based on the settings under Recurring.
In the example given, the Expenses Overview page might show:
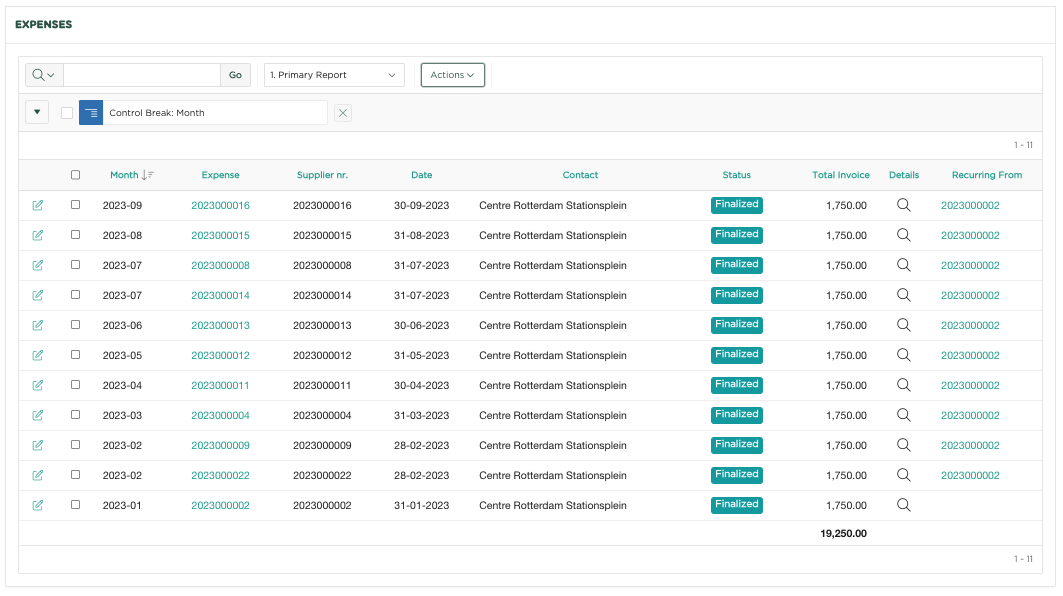
In the overview (where we have selected the contact Center Rotterdam Stationsplein), we see the original Edition as of 1/31/23 and then all the Editions automatically created monthly thereafter, with a reference to the original expense 2023000002 in the Recurring from column.
If we now select this link, we will end up in the original edition, which includes the settings for recurring the editions.
You could now also adjust the Return settings again.
PLEASE NOTE, we have had to adjust the Expenses Overview page, as the Recurring from column is not included 'by default'. We now describe how you can add the relevant column to the overview.
Click Actions at the top of the page
After this the menu opens

Now click Select Columns
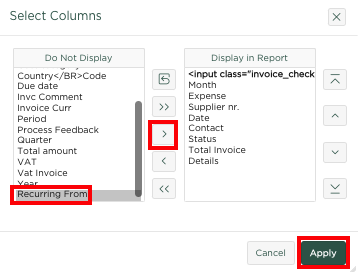
Select the Recurring From column on the left and press the ![]() button so that this column ends up under Shown on report.
button so that this column ends up under Shown on report.
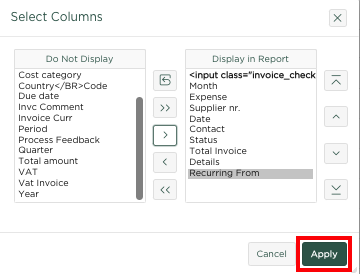
Now press Apply, after which you will see that the column has been included in the overview
Sommige uitgaven zijn terugkerend, zoals bijvoorbeeld de factuur voor de huur van een bedrijfspand.
Het pakket stelt je in staat om zo'n uitgave als 'terugkerend' te kenmerken, waarna deze (bijvoorbeeld) maandelijks automatisch wordt gegenereerd binnen je administratie, zonder dat je daar omkijken naar hebt.
Zie het volgende voorbeeld:
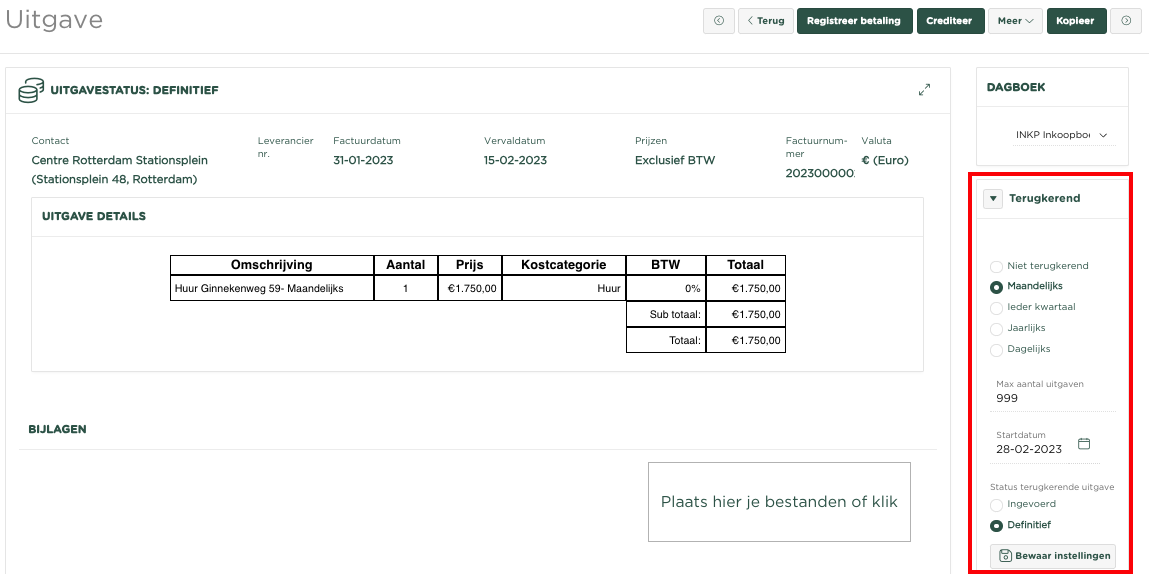
We voeren de factuur van de huur van ons bedrijfspand in en geven aan de rechterzijde van de pagina, onder Terugkerend, aan dat deze uitgave Maandelijks terugkerend is en dat de status van de gegenereerde factuur Definitief zou moeten zijn. Tevens dienen we een Startdatum in te geven, vanaf welke datum de eerst volgende factuur moet worden gegenereerd.
Periodiek toets het systeem of er verzoeken zijn een nieuwe uitgave te genereren op basis van de instellingen onder Terugkerend.
In het gegeven voorbeeld zou de pagina Overzicht Uitgaven het volgende kunnen tonen:

We zien in het overzicht (waar we hebben geselecteerd op het contact Centre Rotterdam Stationsplein, de oorspronkelijke Uitgave per 31/1/23 en vervolgens alle hierna maandelijks automatisch gecreëerde Uitgaven, met in de kolom Oorspronkelijke uitgave, een verwijzing naar de oorspronkelijke uitgave 2023000002.
Selecteren we nu deze link, dan komen we terecht in de oorspronkelijke uitgave, waarin opgenomen de instellingen voor het Terugkeren van de uitgaven.
Je zou nu dus ook weer de instellingen van het Terugkeren, kunnen aanpassen.
LET OP, we hebben de pagina Overzicht Uitgaven wel moeten aanpassen, daar de kolom Oorspronkelijk Uitgave hierin 'standaard' niet in is opgenomen. We beschrijven nu hoe je de betreffende kolom aan het overzicht kunt toevoegen.
Klik boven in de pagina op Opties
Hierna opent het menu zich
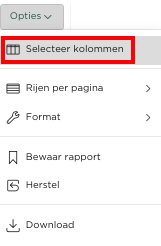
Klik nu op Selecteer kolommen
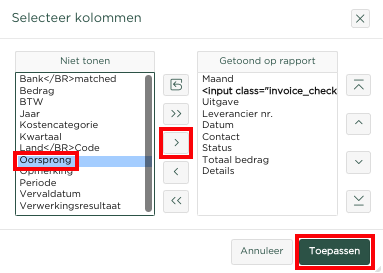
Selecteer aan de linkerzijde de kolom Oorsprong en druk op de ![]() knop, zodat deze kolom onder Getoond op rapport terecht komt.
knop, zodat deze kolom onder Getoond op rapport terecht komt.
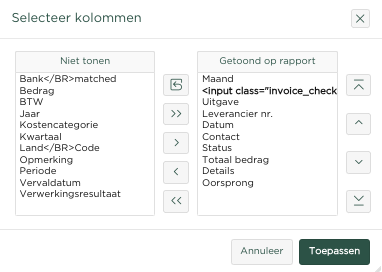
Selecteer nu aan de rechterzijde, onder Getoond op rapport, wederom de kolom Oorspronkelijke uitgave en druk op de knop, zodat de kolom voor de kolom Details zal worden getoond en druk vervolgens op ![]() , waarna je zult zien dat de kolom in het overzicht is opgenomen.
, waarna je zult zien dat de kolom in het overzicht is opgenomen.